This is the last excerpt from my stash of books on loan from our wonderful Powell River Public Library.
Companion Cultivation of Mushrooms with Garden Vegetables
Garden vegetables benefit from the activities of both saprophytic (organism that grows on and derives its nourishment from dead or decaying matter) and mycorrhizal (the symbiotic association of the mycelium of a fungus with the roots of certain plants, such as conifers, beeches, or orchids) mushrooms. First we'll explore the use of saprophytic mushrooms. After discussing our experiments and experiences with these, I'll move on to using mycorrhizae to aid the garden.
Using Saprophytic Mushrooms to Aid the Growth of Garden Vegetables
...Vegetable seeds seek mycorrhizal fungi immediately upon germination. (Mycorrhizal fungi are abundant in nature, but many are difficult to collect and only some, like those of the genera Glomus and Rhizopogon are suitable for most trees and plants.) This pairing of seed sprouts and fungi helps the seeds gather nutrients and prevent parasitization (to infest or infect with parasites). The fungi benefit from the plant's waste products, sugars, hormones, and dead tissues that flake off. When seeds are dusted with a mix of mycorrhizal spores (primarily Glomus aggregatum, Glomus intraradices, Glomus mosseae, Pisolithus tinctorius, and assorted Rhizopogon species), the spores and seeds germinate simultaneously, thriving within the protecting and nurturing mantle of mycelium.
Tuesday, December 6, 2011
Monday, December 5, 2011
Excerpt from "Pollination with Mason Bees"
Continuing on with excerpts from wonderful gardening and/or garden-related books available for loan from Powell River Public Library, the next excerpt is from a 'New Book', "Pollination with Mason Bees", written by Dr. Margriet Dogterom.
Is it a Bee, a Wasp or a Fly?
Bees and wasps are closely related insects that evolved from a common ancestor. The major difference between bees and wasps is that bees, with their specialized branched and plumose hairs, obtain their protein from pollen and are vegetarian; wasps are carnivorous and obtain their protein from meat and other insects. Wasps appear relatively hairless.
Similarly to bees, wasps forage for sugar from flowers and in addition forage for sugar from pop bottles, decaying fruit or any other sugary substance. Flies often mimic bees in colour and shape, but they can be distinguished from bees and wasps by having a close look at their antennae. Bees have a pair of antennae made of rodlike segments. Flies often mimic the striped appearance of bees, but the absence of rodlike segmented antennae is a giveaway that you are looking at a fly and not a bee, no matter what its colour. Bluebottle flies look a lot like mason bees, but their habit of being on refuse and not on open flowers is a good indictor you are looking at a fly and not a bee.
 |
| Mason bee (note the mites on its body) photo source: frog pond photography |
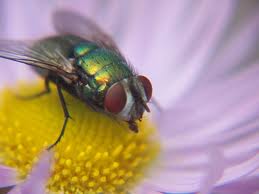 |
| Bottleneck fly |
 |
| Female wasp |
 |
| Simple mason bee nest |
 |
| More elaborate mason bee nest |
Sunday, December 4, 2011
How to Make a Rain Barrel
Once again, an excerpt from "Black and Decker's The Complete Guide to Greenhouses and Garden Projects," on loan from one of my favourite places, the Powell River Public Library.
...you're someone who likes to work and play in the dirt. Or at least you like the thought of it, and you're looking for inspiration to help you get out there. In either case, you've come to the right place. Like a garden itself, this book is filled with diverse bounty. It is a compendium of information, advice, projects, and nitty-gritty details to help you satisfy your passion to grow things...
And no matter what type of gardening you do, the Garden Projects chapter is bound to have something you can really use: planting beds, a compost bin, trellises, potting benches...you name it. Best of all, every design uses simple, inexpensive raw materials that you work with your hands into something that's much more than the sum of its parts. Sounds a lot like gardening, doesn't it?
How to Make a Rain Barrel
Tools and Materials:
Barrel or trash can (minimum 44 gallons)
Tape measure
Drill with spade bit
Jigsaw
Hole saw
Barb fitting for overflow hose
1 1/2" sump drain hose
3/4" hose bibb or sillcock
Teflon tape
Clear silicone caulk
3/4" female pipe coupling
3/4" bushing or bulkhead connector
Channel-type pliers
Fiberglass window screening
Hacksaw
Sheet metal screws
Screwdriver
Cargo strap, with ratchet or bungee cord
Eye and ear protection
Work gloves
- Cut a large opening in the barrel top or lid. Mark the size and shape of your opening - if using a bulk food barrel, mark a large semi-circle in the top of the barrel. If using a plastic garbage can with a lid, mark a 12" diameter circle in the center of the lid. Drill a starter hole, and then cut out the shape with a jigsaw.
- Install the overflow hose. Drill a hole near the top of the barrel for the overflow fitting. Thread the barb fitting into the hole and secure it to the barrel on the inside with the retainer nut and rubber washer (if provided). Slide the overflow hose into the barbed end of the barb elbow until the end of the hose seats against the elbow flange.
- Drill the access hole for the spigot (either a hose bibb or sillcock, brass or PVC). There are many ways to make the spigot connection. We tightened the stem of the sillcock onto a threaded coupling which is inserted into the access hole. Inside the barrel, a rubber washer is slipped onto the coupling end and then a threaded bushing is tightened over the coupling to create a seal. Apply a strip of Teflon tape to all threaded parts before making each connection. Caulk around the spigot flange with clear silicone caulk.
- Screen over the opening in the top of the barrel. Lay a piece of fiberglass insect mesh over the top of the can and secure it around the rim with a cargo strap or bungee cord that can be drawn drum-tight. Snap the can lid over the top. Once you have installed the rain barrel, periodically remove and clean the mesh.
Saturday, December 3, 2011
Jekka McVicar's "Seeds"
Excerpt Number 3, from "Seeds: The Ultimate Guide to Growing Successfully from Seed," again on loan from the Powell River Public Library.
Each seed is a complete self-contained work of art, a unique life capsule containing the blue print for the whole plant with every cell, hair, vein, leaf, petal and root preprogrammed and waiting for germination and growth in order to manifest itself to its full potential. Seeds are a master of ingenuity when it comes to survival. Some are able to lie dormant for many seasons or even years waiting for the right conditions in which to germinate, others evolve slowly adapting to changes in environment. Arctic Lupin seeds have been found to be viable after lying in permafrost conditions for 10,000 years. The means of seed dispersal is equally staggering - some fly, some fall, some float. The Dandelion seed can travel 200km (125 miles) in a storm, and fern spores have been known to travel 20,000km (12,400 miles) from their parent. They use the air, water, animals, birds and humans to arrive at their destination and start their cycle all over again...
...All the plants in this book have been chosen with simple criteria in mind. They are all either common garden plants, whose seeds are simple to collect, or plants whose seeds are easily available through retailers....
...This books is to be used as a springboard into the world of growing plants from seed. By following a few simple steps (as simple as baking a cake), and not being too ambitious at the start, you will be rewarded by having a flourishing garden at a minimal financial cost with maximum pleasure and a great sense of achievement.
Rosa Rosaceae
A genus of hardy, deciduous, or semi-evergreen shrubs and climbers grown for their lovely, often scented flowers. Plant in a fertile, free-draining soil that does not dry out in summer, in a sunny situation.
It is worth mentioning that only old shrub roses and species roses can be grown successfully from seed.
Collect the seeds in autumn from ripe hips. Mix the seed with propagating coir and put the mixture into a plastic bag. Seal and label the bag and put it in a warm place at 20 degrees C for 2 months. Place the plastic bag into the refrigerator for a further month. Finally sow the seeds into pots or modules using standard loam-based seed compost (substrate) mixed with coarse horticultural sand. Mix to a ratio of 1 part compost + 1 part sand. Cover with coarse horticultural sand and place in a cold frame. Germination takes 2-3 months but can take longer. When the seedlings are strong enough, pot up singly in 8cm (4in) pots using a loam-based potting compost. Grow in the cold frame for a further season before planting out.
 |
| Rose hips on bush near Old Post Office in Townsite, Powell River |
Friday, December 2, 2011
Natural Pest Control
Following is an excerpt from another gardening book entitled, "Urban Homesteading: Heirloom Skills for Sustainable Living", available at our wonderful Powell River Public Library. This book was written by Rachel Kaplan with K. Ruby Blume.
Natural Pest Control
While insects can be beneficial, when out of balance they can also be hazards in the garden. Your best protection against pests is healthy soil and strong hearty plants. Interplanting and companion planting strategies also provide natural pest control. While waiting for your pollinator and beneficial insect beds to mature, there are some other low-level, nontoxic ways of dealing with pests in the garden. Unless the pests are completely decimating your plants, sometimes the best option is just to share. Your greens might have a few holes in them, but that just proves they are organic.
- Hand-picking insects and other pests off plants is an easy, front-line defense. Snails can be handpicked off plants every night for up to two weeks and exported to interrupt their breeding cycle. They can also be fed to the chickens, which snaps them right up.
- All-Purpose Spray (works against many pests, including slugs and Japanese beetles): Ingredients: 1 garlic bulb, 1 tsp cayenne pepper, 1 quart water, 1 small onion and 1 tbsp mild biodegradable liquid dish soap or Dr. Bronner's soap. Instructions: Chop garlic and onion in the blender. Add the cayenne pepper and water, steep for 1 hour and strain. Add dish soap so that spray will stick to the leaves. Mix well. Spray mixture on both sides of leaves. Do not spray greens or plant parts you want to eat. Store mixture in the fridge or it will go bad. This also works with just garlic. You can also make a mixture of hot pepper and powdered garlic and store it until you need it. Mix with water, spray the leaves, and wash the leaves off before you eat them.
- Hot pepper spray, a mixture of 1/4 cup hot peppers and two cups of water, can be blended, strained, and applied to plants every day for 5 to 7 days until pests are gone.
- Watering in the morning or at soil level, instead of overhead watering, can also help with a number of pests and disease issues. It gives leaves time to dry, which helps prevent fungal diseases that thrive in damp conditions. It also gives things a chance to dry out before sundown, thus preventing slugs and snails from travelling (which they like to do at night, in moist conditions).
- A jar lid, saucer, or other shallow container settled into the soil then filled with beer will attract and drown many pests, especially earwigs and slugs.
- A short section of old hose or a rolled up newspaper will attract nighttime marauders like earwigs. These can be collected and moved well away from the garden in the morning.
- A board laid on the soil with a little bit of crawl space is good for collecting slugs and snails. In the morning, they can be gathered and fed to the chickens.
- Birds eat lots of insects. Providing a birdbath may attract them. A birdhouse or two will encourage birds to stay and pick off insects for you. (They will also eat your peas or beans when you plant them , so you'll have to cover those plants with netting until they sprout.)
- Lizards, frogs, and toads are great insect catchers. Make them feel welcome. If they have a favourite place in a pile of pots, on a pile of rocks, or in a water trough, let them claim it as home and don't disturb them.
- Plant a little extra for the bugs so you can share your bounty.
 |
| Beer traps |
Thursday, December 1, 2011
Ten Benefits of Raised Beds
Below is a short excerpt from the book, "Homegrown Harvest: A Season-by-Season Guide to a Sustainable Kitchen Garden," found in amongst the gardening books at our wonderful Powell River Public Library.
Ten Benefits of Raised Beds
Ten Benefits of Raised Beds
- Raised beds allow easy access and require less bending
- Soil in Raised beds warms up more quickly in spring
- You can plant closer and get higher yields
- Well-constructed raised beds provide ample growing depth and excellent drainage
- You can import new soil that is most appropriate to your crop
- One raised bed is less daunting than a large vegetable garden and may be the best way to begin
- Raised beds can be made in any shape, and from any material to match the style of your garden
- Row covers, netting, and plant supports are easy to manage in a raised bed
- Well-maintained raised beds provide an attractive landscape feature
- Paths around raised beds allow the soil within the bed to remain uncompressed by treading, thereby protecting its structure
 |
| complete wooden raised bed garden |
 |
| long raised wooden beds |
 |
| simple wooden raised bed |
 |
| purchased pvc square bed (available in circular shapes as well) |
 |
| reusing vehicle tires |
You are only limited by your imagination.
Subscribe to:
Posts (Atom)